How to Export Models from Blender to Unity
Introduction
In this tutorial, we will learn how to correctly export FBX models from Blender to Unity, once and for all. For starters, here are the showcases of the results we will achieve by the end of this tutorial:
If you've ever had the pleasure of working in Blender-to-Unity pipeline, you will most likely have had weird behaviors in Unity after importing a model from Blender. Chances are that the following will feel familiar to you:
- Objects in Unity face backward.
- Object Transforms have weird rotation values such as -90 on the X axis, 180 or -180 on the Y or Z axis.
- Objects are either way too big, or way too small, with the Transform Scale values being not uniform (1, 1, 1).
So what did you most likely do in those situations? You either:
- Used the model as is.
- Positioned the model correctly in the scene view, slapped it inside an empty GameObject, created a prefab out of it, and called it a day.
- Turned to Google to look for the "correct way" to export models to Unity.
The first option works great at first since you don't have to do anything extra. You have your model and you're enjoying the fruits of your hard labor. But the joy appears to be short-lived when you try to manipulate the object's Transform in code. You use Transform.forward vector to move the object in the direction it is facing but your model, instead of strutting forward, suddenly moonwalks backwards, or sideways. Okay, no big deal. You can fix this using the second option.
The second option, indeed, fixes the problem seen with the first method, and is a viable solution. However, it requires manual object placement into the correct orientation first and wrapping it inside another GameObject. You could automate this by spawning the model inside an empty GameObject and adjusting its transform accordingly in code. But this is bug-prone and hard to consistently achieve good results with. Your GameObject factory will not be able to tell dynamically how to orient the object correctly, since every object may be exported from Blender with different transform values. This can happen if, for example, different artists who use different export settings contribute to your asset pool, or simply by accident. Frustrated with the prospect of having to deal with such problems in the future, you come to the conclusion that the second option does not fit your workflow and you turn to option three.
Unless you have created your own FBX export pipeline by modifying Blender's FBX exporter and creating custom asset post-processors in Unity, you failed to find a complete answer on Google, as it was simply not possible to achieve perfect results without putting in elbow grease. That was until recently. In this tutorial, we will see how to easily export models to Unity, both static and rigged, in a proper way, which will face the correct forward direction (or any direction you want that you specify in Blender) with all their transforms at perfect values and no unexpected behavior when manipulating their Transform values via code.
FBX vs .blend
There are two main ways to get your Blender models to appear in Unity:
- Export models as FBX files and copy them over to Unity.
- Store the whole .blend file in Unity directory and let Unity handle all the hard work.
In this tutorial, we will cover both cases. As to which exporting method is better and which you should use, it's up to you for now (we will explore this topic in a future post). I like to keep my source files separate from the production assets so I export to FBX first.
We will handle the exporting to FBX case first, and then the .blend case later at the end of this tutorial.
Setting Correct Axes
Before we dive head first into this, we need to correctly define the transform axes we will be using because Blender and Unity use different axes for their FORWARD and UP directions.
Unity uses:
- +Z as the FORWARD axis
- +Y as the UP axis
Blender, on the other hand, uses:
- +/-Y as the FORWARD axis
- +Z as the UP axis
So, is the FORWARD axis +Y or -Y in Blender?
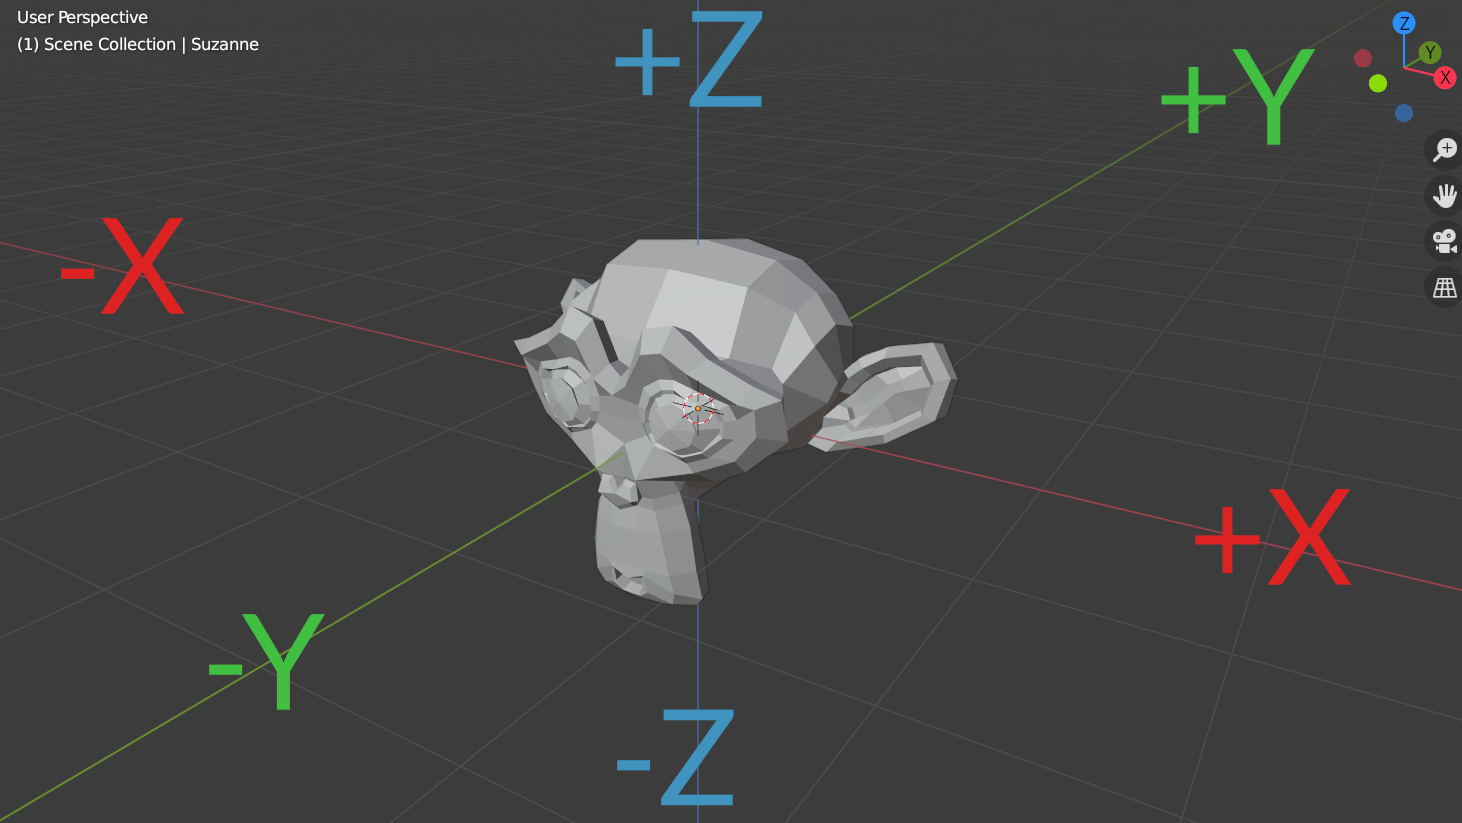
Blender doesn’t have the forward axis defined as either +Y or -Y. Forward axis in Blender is simply “along the Y axis.” From the way Blende's “flagship” mesh object — monkey Suzanne is oriented when adding her to the scene, we can infer that the forward axis should be -Y, since Suzanne faces in the -Y direction and if she were to move in this direction, the most accurate way to describe this displacement would be as “moving forward.”
When exporting FBX, if the Forward axis is set to -Y, the exporter expects the +Y as the forward axis and will apply a rotation of 180 degrees on the Z axis to the root object so that it's facing in the +Y direction.
To account for the difference, we need to tell Blender which axes we want the FBX exporter to write to the file as being the object's UP and FORWARD axes. But which do we define as which?
Defining the Forward Axis
Let's assume that the front view in Blender is defined as observing from the -Y axis towards the +Y (facing the +Y axis). If we look at out beloved monkey Suzanne in the image below, we'll see that she's facing the -Y direction. If Suzanne were to start walking (or rather floating?) forward, she would move in the same -Y direction. Objects usually move forward with their front and we want them to be oriented that way, therefore our FORWARD axis is -Y.
Defining the Up Axis
Up axis is the direction Suzanne would move if she were to jump, which is the +Z axis.
When exporting, we will use -Y as the FORWARD axis and +Z as the UP axis.
How Blender Exports FBX
Let's say we have a hierarchy of 5 parented objects with all their transforms reset to default values. This means that for every object in the chain, the following are true:
- Location is (0, 0, 0)
- Rotation is (0, 0, 0)
- Scale is (1, 1, 1)
If we export them with the default FBX exporter settings, we will get the following Transform values in Unity:
| Root Object | Root Object's Children | |
|---|---|---|
| Position (x, y, z) | 0, 0, 0 | 0, 0, 0 |
| Rotation (x, y, z) | -89.98, 0, 0 | 0, 0, 0 |
| Scale (x, y, z) | 100, 100, 100 | 1, 1, 1 |
All children have the values we want but the root object does not. We want all rotation values be at 0 degrees and all scale values at 1. Let's investigate how we can fix the parent. We'll start from the easiest and move on to the hardest.
Let's see what happens when the object hierarchy chain consists of an armature with its bones. The same initial transform rules apply with the exception of bone position. We're going to extrude the bones upwards to make the chain so their position will not be 0, 0, 0, but rather the position they will have been extruded at.
If we export the armature with the default FBX exporter settings, we will get the following Transform values in Unity:
| Root Object | Root Bone | Other Bones | |
|---|---|---|---|
| Position (x, y, z) | 0, 0, 0 | 0, 0, 0 | Extrude position |
| Rotation (x, y, z) | -89.98, 0, 0 | 89.98, 0, 0 | 0, 0, 0 |
| Scale (x, y, z) | 100, 100, 100 | 1, 1, 1 | 1, 1, 1 |
Even if we try and set the Forward and Up axes in the exporter settings to the ones we have defined earlier, we still won't get the correct result. For that, we're going to need some stronger workarounds.
Fixing Scale
This one is pretty straightforward. Set the Apply Scalings option to FBX All in the Transform section of the FBX exporter panel and you'll never have to worry about it again.
Re-export the model and you'll see that the scale is now (1, 1, 1).
Fixing Position
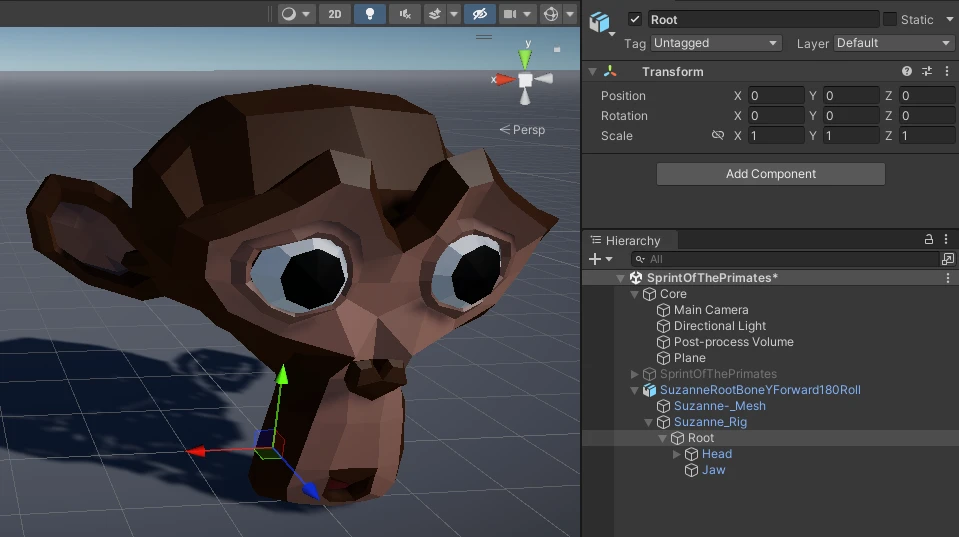
With regard to position, this is not the case of Blender doing something wrong. Unlike with rotation, It does exactly what you expect it to do and exports the model at whatever position you have it set at. However, we often want to have the model exported with its root object at the world origin (0, 0, 0). To do this, we can select the object we want to move there and press Alt + G .
Fixing Rotation
Now, this one is the mother of all that is painful. The moment you want to move objects in specific ways in Unity via manipulating their Transform values in code, you may get unexpected behavior that you really don't want to have. So, how can we spare ourselves the agony and make sure that the rotations are correct in Unity? For completeness sake, we will discuss the old methods of exporting first, and leave the best one for the end. Let's see:
Apply Transform
The easiest solution probably everyone has tried at least once is to use the Apply Transform option.

Often times, it seems to fix the problem. However, there is a triangle with a question mark icon next to its name and a tooltip warning us about the experimental state of this option. Nonetheless, it sounds from the description that it does what we want, and it sort of does, but not without consequences:
- If the mesh is rigged or animated, this option will break those (what broke may or may not be apparent at first).
- If the object is not rigged and its hierarchy is larger than 2, objects at depth 3 in the hierarchy and beyond will still have incorrect transform values. This is a problem if you're building a complex object that requires deep and sophisticated parent-child relationships. When you try to manipulate their transforms in Unity via code, you may get erroneous results, such as things moving and rotating not as expected.
I’ve been using Apply Transform export option without any issues, even with rigged meshes.
It was most likely because your meshes didn't have complex parent-child relationships, or you didn't manipulate bone transforms in code.
See these issues with examples of what kind of problems you can run into by using this option:
https://developer.blender.org/T43352
https://developer.blender.org/T70799
Can’t I export the parts of the complex objects un-parented and then parent them in Unity?
I guess but there is a better way.
It’s sort of like being a 3D artist who does sculpting for a living and whose drawing tablet suddenly dies, but they decide to just work with the mouse for the rest of their career instead of getting a replacement. Why cripple yourself when a perfect solution to the problem is available?
In summary, Apply Transform should never be used as there is a different easy and perfect solution for exporting. However, if you insist, it can be a viable solution only in the following cases:
- Mesh is static (not rigged or animated).
- Object hierarchy is not deeper than 2 levels.
Pre-Rotate Object
If your object is rigged and parented to the armature, the following steps will result in correct transform values in Unity:
- Set armature rotation to -90 degrees on the X axis.
- Apply Rotation by pressing Ctrl+A > Rotation.
- Rotate the armature by 90 degrees on the X axis.
- Select all children objects of the armature and Apply Rotation.
- This is necessary because when Applying Rotation, Location, or Scale Blender sets that transform value to all object’s immediate children. By selecting all children first and applying their transforms we save ourselves some time and sanity by avoiding applying transforms in one by one.
After going through these steps, the objects appear to have correct transform values in Unity. However, the 3rd object in the hierarchy displays -89.98 rotation on the X axis while all the other ones are correct (tested up to 5 levels deep). I’m not sure what causes this, but it is peculiar.
In summary, Pre-Rotating object should never be used as there is a different easy and perfect solution for exporting. However, if you insist, it can be a viable solution only in the following cases:
- Mesh is static or skinned (rigged or animated).
- Object hierarchy is not deeper than 2 levels.
Uncheck Use Space Transform — The Best Way
Static Meshes
This is a new option that is available starting from Blender 2.92.

This option was added to Blender source as far back as June 2020 but only now has found its way into the core Blender release. Even though this option didn’t exists in the way it is defined now, under the hood, its functionality has always been “enabled” meaning that, just as the description in the image above says, Blender has always applied global space transform to every object before exporting.
How can we leverage this option in our Quest of Perfect Transforms in Unity? Simply uncheck this option and export away.
This is not the end, though. If you import your exports in Unity, you’ll be disappointed to see something like this in your object inspector:

My rotation values are (0, 0, 0) but the mesh is oriented incorrectly.
Make sure you have set the Forward and Up axes to -Y and +Z respectively in the Blender’s export window.
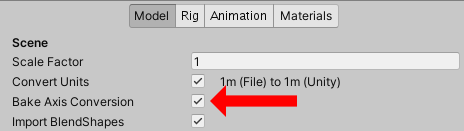
For static meshes, this is where the final piece of the puzzle comes into play. Select your imported model in the Project view and tick the Bake Axis Conversion checkbox in the model importer inspector window. This is a recent option introduced in Unity 2020.1 and together with Blender's Use Space Transform option disabled, marks the end to the utter confusion and torment that was plaguing the community for over a decade.
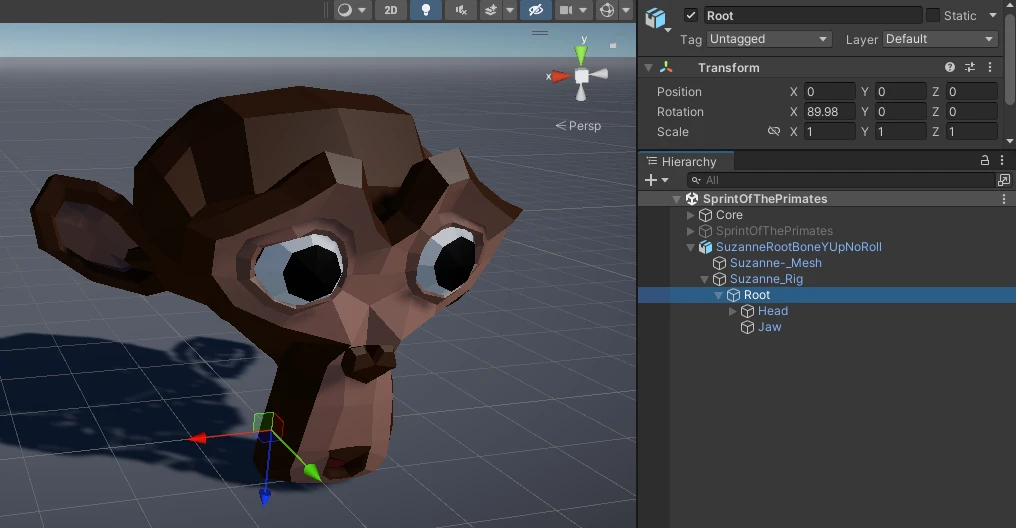
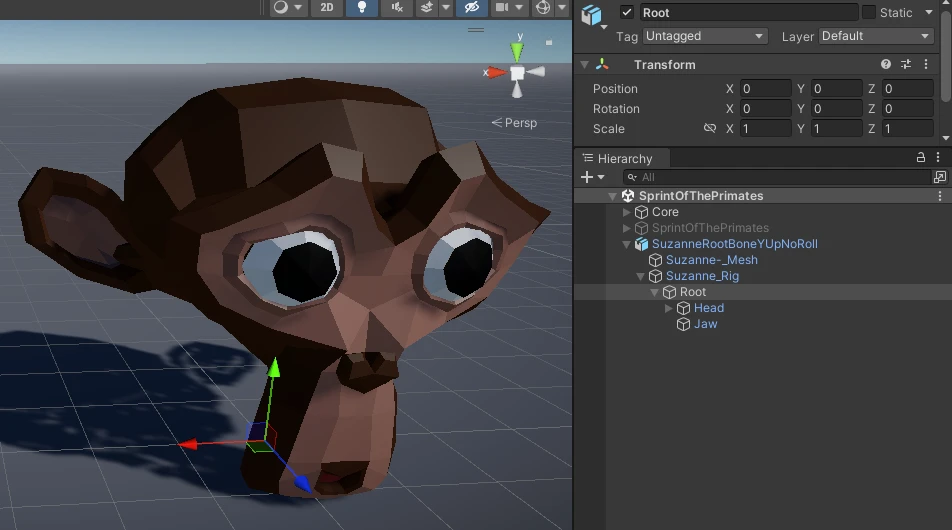
For skinned (or rigged) meshes, this is not over yet, as we have to deal with the root bone separately.
Rigged Meshes
The Uncheck Use Space Transform option reintroduces the issue with rigged meshes that was solved with the Pre-Rotate Object method described earlier — the root bone of the armature retains the 89.98 degree rotation on the X axis. But fear no more, as this issue can be effortlessly solved once we understand the root cause of it — the fact that, unlike regular objects, Blender attaches different level of importance to bone axes.
Primary and Secondary Bone Axes
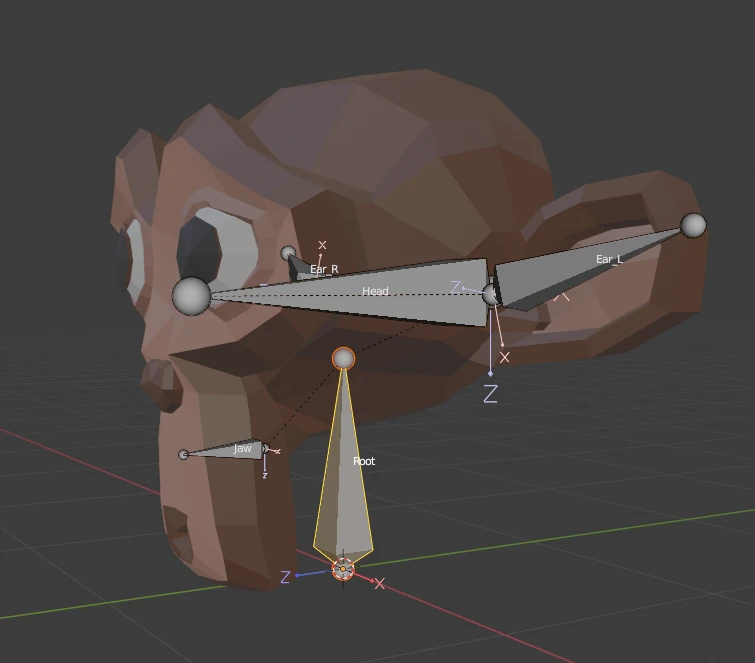
In Blender, all objects have 3 axes: X, Y, and Z. All of them are of equal importance when it comes to object manipulation. Bones have 3 axes as well, but one of them — the Y axis, is treated special by Blender. This is the axis that the bone scales and stretches along from the head to the tail and the axis the bone rolls about. If you go to the FBX exporter settings and expand the Armature panel, you'll see two entries named Primary Bone Axis and Secondary Bone Axis.
- Primary Bone Axis refers to the direction a bone's local Y axis points to.
- Secondary Bone Axis refers to the direction a bone's local X axis points to.
These settings help Blender understand which axes to write to the FBX file as primary and secondary. The target application we export the mesh to then reads this data and imports the bones accordingly.
These settings apply to all bones. However, because the root bones transform values propagate down its offspring hierarchy, we choose which axes to set as Primary and Secondary based on the way the root bone of your armature is oriented,
To put it simply, whichever axis you set as Primary, Blender will take note of that and write it accordingly into the FBX file. After importing the model into Unity, the resulting root bone transform rotation values will reflect the rotation value difference the bone would have to be rotated by so that its local +Y axis in Blender matched the axis set as Primary. Once we look at a few examples, it will become clear.
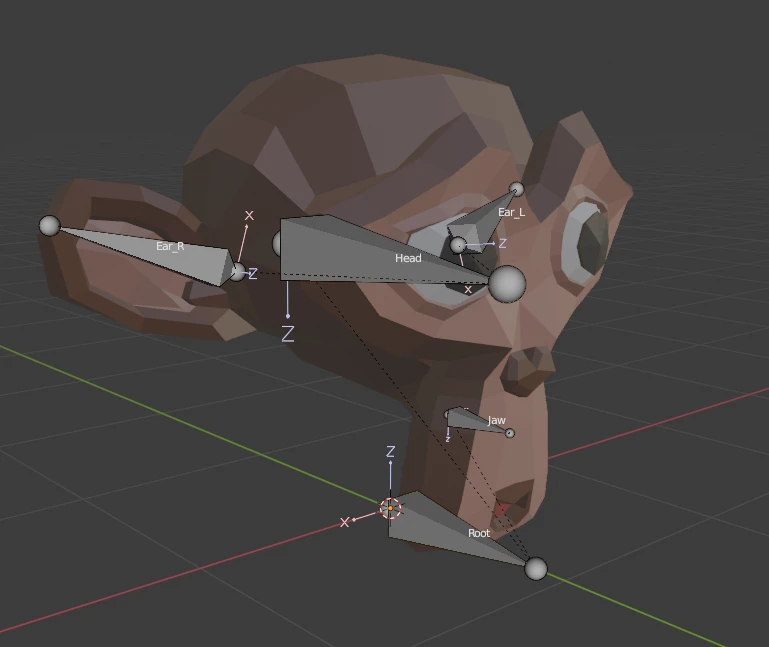
Disclaimer — as the images below lack the global axes indicator, keep in mind that the monkey Suzanne in them is looking in the direction of the global -Y axis (we would see her face when in Front Orthographic view).
Root Bone Facing Global Z-Axis, No Roll
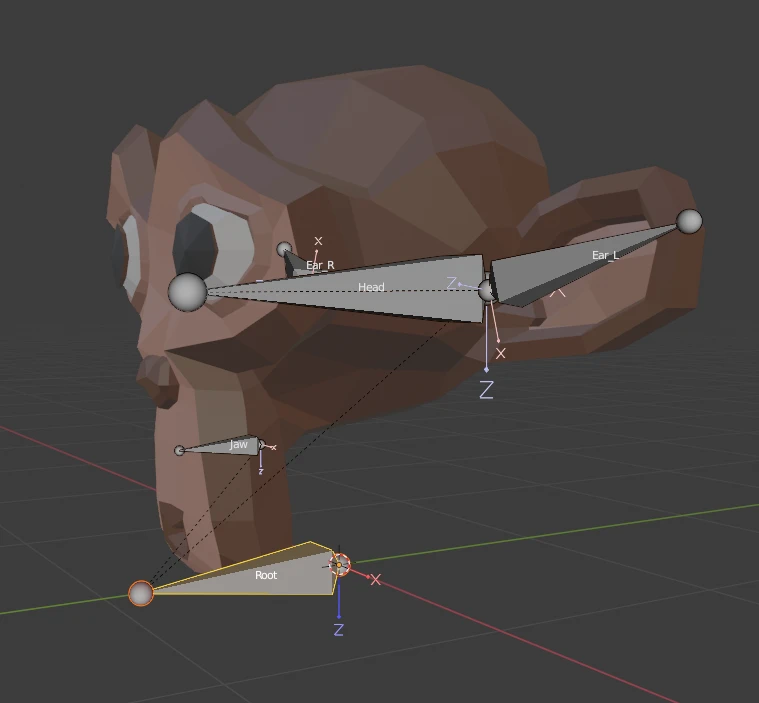
First, let's export the following Suzanne with her armature using the Uncheck Use Space Transform method leaving the Bone Axes settings to default Primary Y, Secondary X. In our case, her root bone is oriented with its Y axis pointing towards global Z and its X towards global X:
If we inspect the model in Unity, we will see that the root bone has a 90 degree rotation on the X:
Since the Primary Axis value was set to Y, and the root bone's local Y axis pointed towards global Z, there is a difference of 90 degree rotation on the X axis between the two positions. In other words, we would have to rotate the root bone in Blender by 90 degrees for the root bone’s local axis to match the one we set as the Primary Axis. The Secondary Axis and the root's X axis match perfectly, therefore we do not see any other rotational aberrations in that regard.
To fix this, we need to set the Primary Axis to the one which would match the root bone's local Y axis. In this case, it is Z axis. Re-export to Unity and the result is as follows:
Root Bone Facing Global -Y-Axis, -180 Degrees Roll
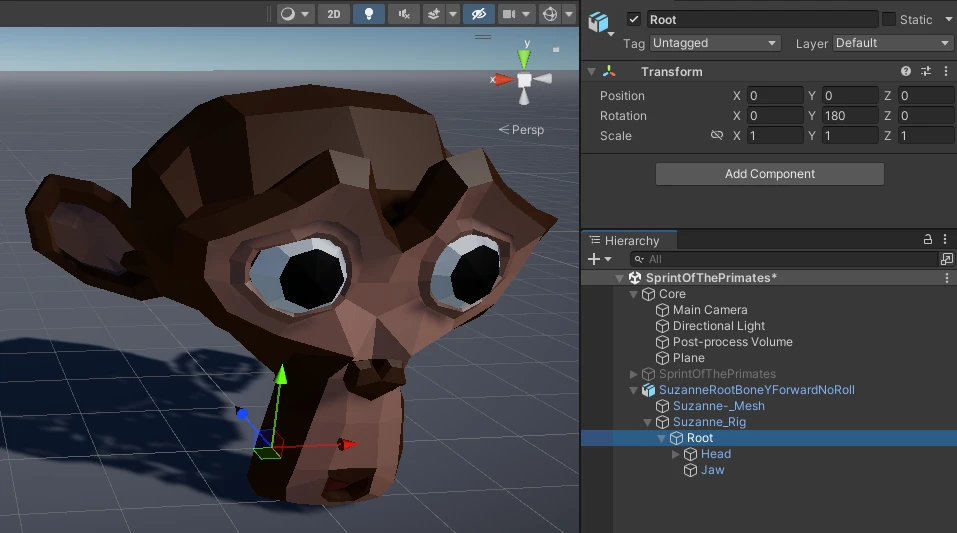
Next, let’s rotate the root bone by 90 degrees on the X axis so that it lies horizontally. This rotation will result in a -180 degree roll. We will export this Suzanne with her armature using the Uncheck Use Space Transform method leaving the Bone Axes settings to default Primary Y, Secondary X. This time, her root bone is oriented with its Y axis pointing towards global -Y and its X towards global X:
Exported in Unity, the Inspector shows predictable results. Since the root bone's local Y axis points to global -Y, and the Primary Bone axis was set to Y, there is a 180 degree rotation deficit on the X axis. Both X axes still match, so they don't give us any trouble.

To correct this, simply set the Primary Bone Axis to -Y:
Root Bone Facing Global -Y-Axis, No Roll
The last example we will take a look at is the root bone facing -Y direction, with its roll set to 0 degrees. We will export using the Uncheck Use Space Transform method leaving the Bone Axes settings to default Primary Y, Secondary X, once again.
In Unity, the root bone is rotated by 180 degrees on the Y axis. This time, there is discordance between both bone's axes and their respective Bone Axes settings. The bone's local Y axis points to global -Y when the Primary Bone Axis is set to Y, and the bone's local X axis points to -X, when it should point to X, hence the 180 rotation in Unity:
To correct this, we need to set the Primary Bone Axis to -Y and Secondary Bone Axis to -X.
You may have noticed that if you always place your root bone so that its local Y axis is pointed along the +Y axis and make sure its roll value is set to 0, the Primary and Secondary Bone Axis settings can be left default.
Bone Axes with Different Transform Axes
For example, you may like to model in a way that when you enter the Front Orthographic view (e.g., by pressing Numpad 1 on your keyboard) you see the back of your object, instead of the front. As a consequence, to have the correct mesh orientation in Unity, you would have to set the Transform Axes to +Y Forward and +Z Up. In this Transform configuration, to have correctly oriented root bone of your armature in Unity, the same rules apply as witness with the examples above.
Sprint of the Primates
You know what? I've caught wind of some hot developments. It appears that a festival called the Sprint of the Primates is going to take place right about now! During this event, we will have a chance to witness with our own eyes the impact the different Primary Bone Axis settings make on the participants of the event. But first, let's get to know our participants!
- Participant #1 — Primary Bone Axis is set to default Y
- Participant #2 — Primary Bone Axis is set to Z
- Participant #3 — Primary Bone Axis is set to -Y
Several characteristics apply to all participants:
- The Secondary Bone Axis is set to X
- The root bones axes:
- Local Y points to global Z (therefore, during export, Primary Bone Axis was set to Z)
- Local X points to global X
This is going to be a two-stage event. In the first stage, the event entrants will be driven towards the finish line by the following code:
using UnityEngine;

public class FollowBehavior : MonoBehaviour
{
    public float MovementSpeed = 1.0f;

    private void Update()
    {
        MoveForward();
    }

    private void MoveForward()
    {
        transform.position += transform.forward * Time.deltaTime * MovementSpeed;
    }
}
As we can see, the movement will be along their forward vector, i.e., the way they are facing. All of the contestants have already set their eyes on the grand prize. Let the race commence!
Fortunately for the participant #2, their rivals appeared not to be interested enough in the coveted prize. This was observed because one axis of their root bones were rotated by the Unity mesh importer due to incorrectly set Primary Bone Axis when exporting from Blender.
You can parent to an empty game object and move that instead.
That is beside the point. The root bone is being moved here simply for demonstration purposes. I might have animated the jaw bone that moves the jaw of the monkey up and down using the Transform.down vector and we would see the same results — #2 jaw would drop down correctly, while the jaws of #1 and #3 would "fly off" in any other direction but down.
Moreover, in any armature, there are generally more than one bone, and all the other bones are usually children of the root bone, meaning that all of them will inherit the rotation values of the root. So the same inconsistencies in the movement and rotation behavior will be observed when manipulating the transforms of the children.
It's time for the second stage of the event! This time, not only will the participants move along their forward vector, but also have to look directly at the prize as they beeline toward it. Here is the code for stage 2:
using UnityEngine;

public class FollowBehavior : MonoBehaviour
{
public float MovementSpeed = 1.0f;
public Transform LookAtTarget;

    private void Update()
    {
        LookAt();
        MoveForward();
    }

    private void MoveForward()
    {
        transform.position += transform.forward * Time.deltaTime * MovementSpeed;
    }

    private void LookAt()
    {
    	transform.LookAt(LookAtTarget);
    }

}
Ready, set, go!
What happened to our contestants? If you take a closer look at the code, you'll see that the rotation of the root bones are being overwritten every frame as to make the monkeys comply with the added rule in stage 2 by rotating toward the banana. This rotation resets #1 and #3's initial rotation that were set by Unity's mesh importer, forcing them into compromised orientations. However, because their rotations were altered so that their forward vectors faced the banana, the monkeys moved in the correct direction.
So, the #2 is the winner. But you may be thinking that the rules for stage 2 were unfair on account of the condition stating that the participants had to look directly at the prize while making a run toward it, resulting in them having a longer path to travel, and you would be right! The rule was unfair. Maybe that's the reason why they started quarreling after crossing the finish line?
Step by Step Instructions How to Properly Export Models from Blender to Unity as FBX
Make the following changes to the default settings:
In Blender:
- Make sure the object Transform values are set to the following (unless you have a specific reason to keep these values custom): - Location: (0, 0, 0) - Rotation: (0, 0, 0) - Scale: 1, 1, 1
- In the FBX exporter panel, set the following settings:
- Transform panel:
- Apply Scalings: FBX All
- Forward: -Y Forward
- Up: Z Up
- Use Space Transform: unchecked
- Armature panel (if the mesh is rigged):
- Primary Bone Axis: set to the axis the root bone's local Y axis points to
- Secondary Bone Axis: set to the axis the root bone's local X axis points to
- Transform panel:
- In the FBX exporter panel, set the following settings:
In Unity:
- In the Model Importer Inspector window: - Bake Axis Conversion: checked
Step by Step Instructions How to Properly Export Models from Blender to Unity using .blend
When using this method, the Use Space Transform and Forward/Up settings in the FBX exporter panel won't have any effects when exporting FBX files. Instead of the entered values, the exporter will use the values we hard-code into the init.py file below.
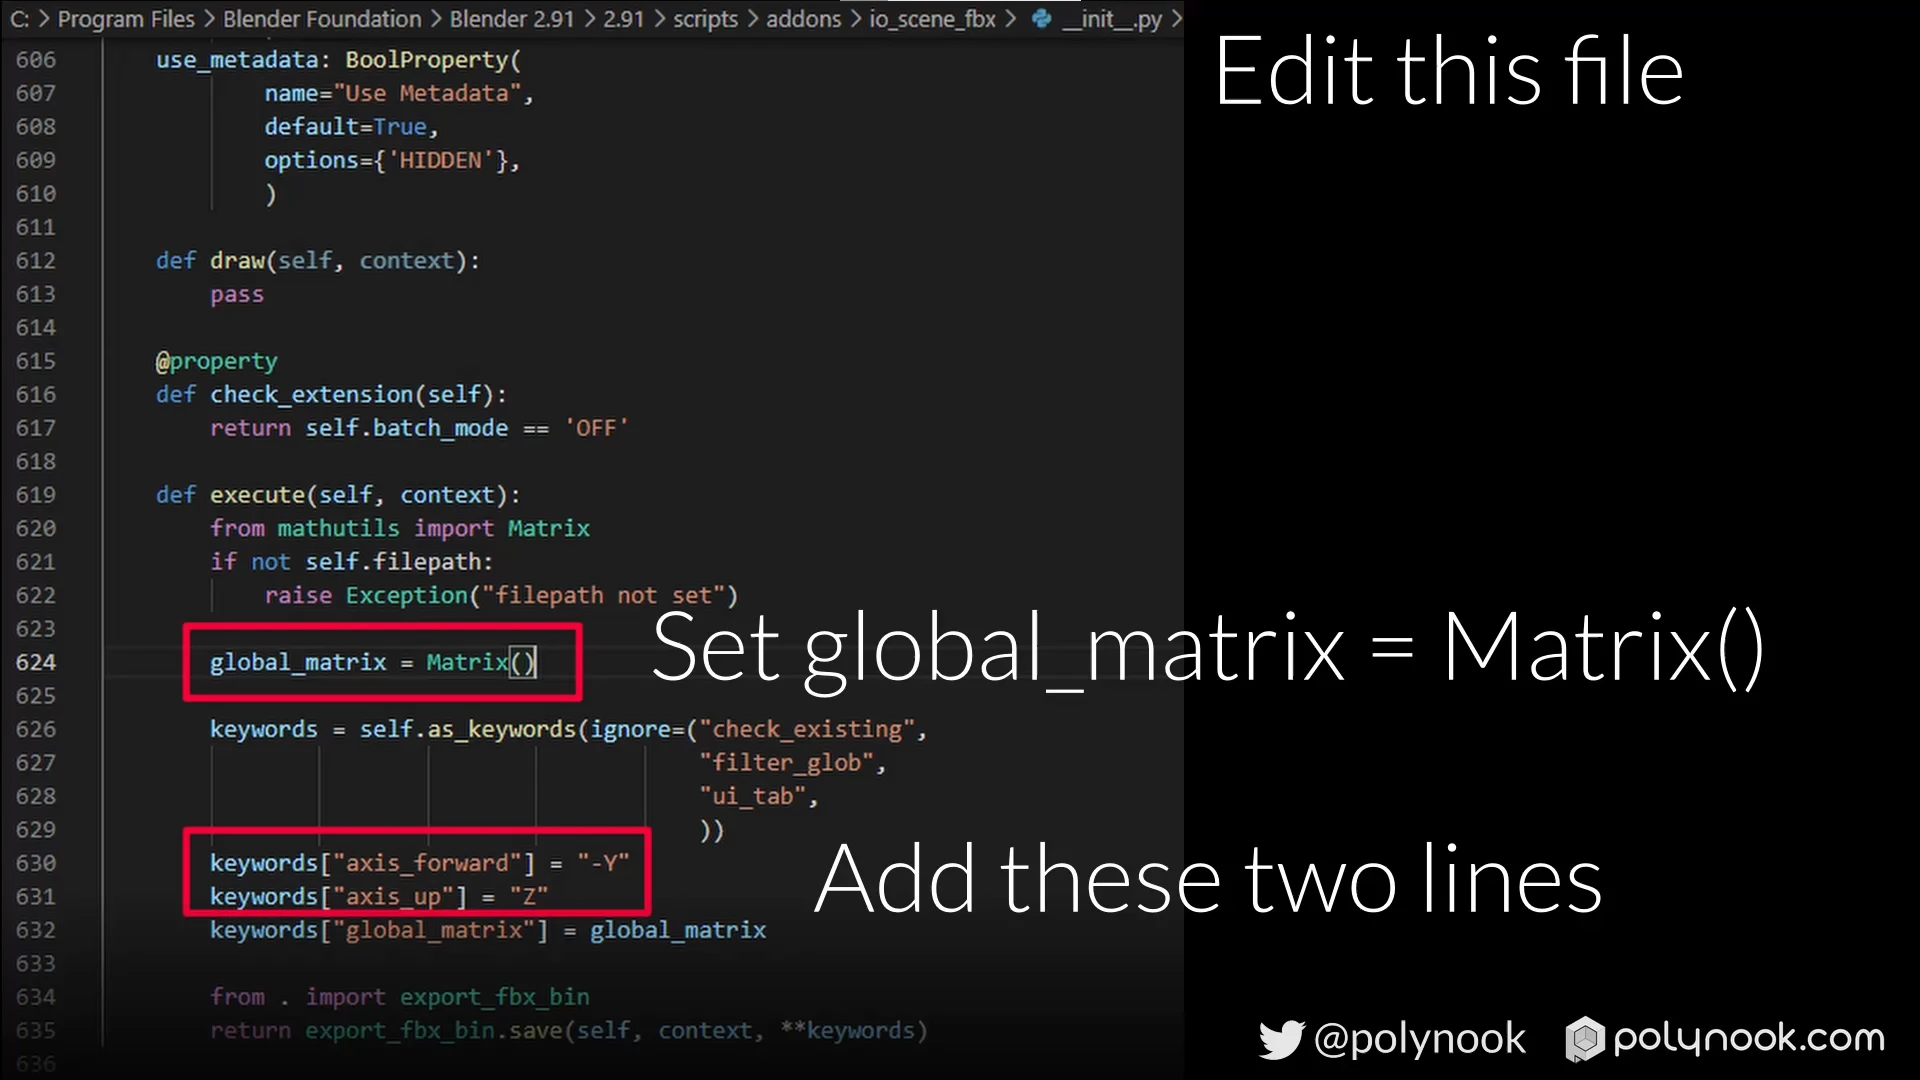
In Blender:
- Make the following modifications to init.py file located at C:\Program Files\Blender Foundation\Blender 2.93\2.93\scripts\addons\io_scene_fbx
- Set global_matrix = Matrix() at line 631
- Several lines down, above the line keywords["global_matrix"] = global_matrix, add the following two lines:
- keywords["axis_forward"] = '-Y'
- keywords["axis_up"] = 'Z'
In Unity:
- In the Model Importer Inspector window:
- Bake Axis Conversion: checked
Having Fun with Forward and Up Axes
And finally, if you haven't modified the init.py file, the Forward and Up axes in Blender's exporter now work correctly. You can set them up in Blender according to what orientation your model faces, and the model will still be oriented correctly in unity. Let's take a look at an example.
Say, for whatever reason, you decided to model an object like in this picture:
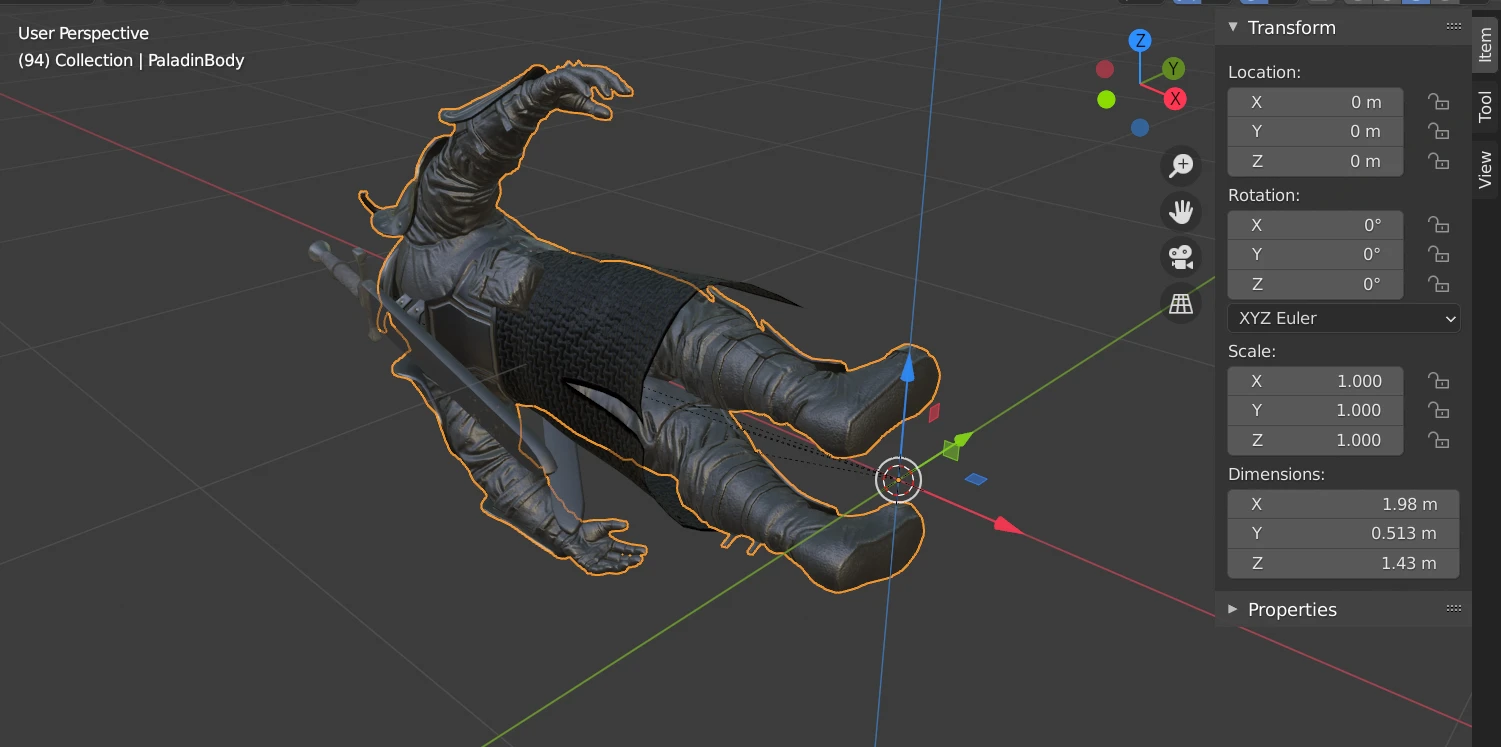
By following the outlined steps above, we can have a perfect result in Unity. All we need to do is set the correct Forward and Up axes in Blender FBX exporter. In the image above, our model is facing the +Y direction and its head is pointing in the -X direction, therefore, we need to set the Forward axis to +Y, and Up axis to -X, like this:
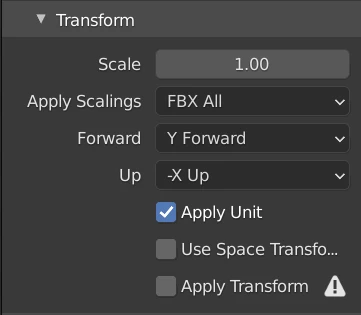
We hit Export, open up Unity, check the Bake Axis Conversion toggle and admire the results:
Conclusion
There we go. Let's enjoy our newly found power to the fullest.